Ease - Ghost Theme Documentation
Table of Contents
- Installation
- Membership
- Search
- Featured Posts
- Related Posts
- Disqus Comment
- Copyright Text
- Social Links
- Hosting Fonts Locally
- Hosting jQuery Locally
Installation
When you purchase a theme from IVEEL, you will have an access to the theme directly on your account page. Once you click the download link, an installable theme file will be downloaded to your computer.
- Navigate to
Settings > Designon your Ghost Admin (yourblog.com/ghost).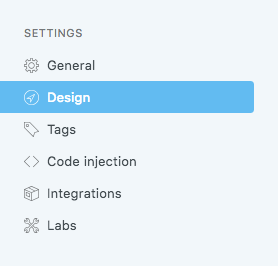
- Click
Upload a themeand select the downloaded installable theme file.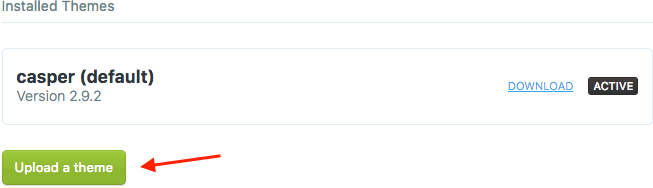
- Click
Activate Nowto start using the theme.
Membership
- Navigate to
Settings > Labson your Ghost Admin. - Enable the feature in
Members > Enable members.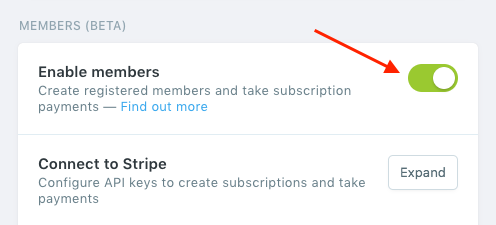
- Set your pricing in
Members > Subscription pricing. - Make sure
Members > Allow free member signupis checked to allow free subscribers.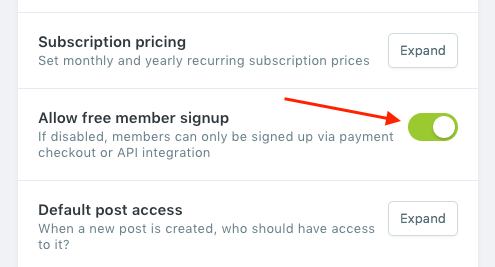
- To send signup and signin links, make sure you configured email settings in
config.production.jsonfile. You can read more on Ghost's documentation. - To send newsletter (bulk email) to your subscribers, Ghost needs your Mailgun domain and API key. Insert them in
Members > Email settings. - Upload new routes in
Beta features > Routes. The routes fileroutes.yamlis in the theme folder. It adds new routes to your blog which are used for signup, signin and account pages.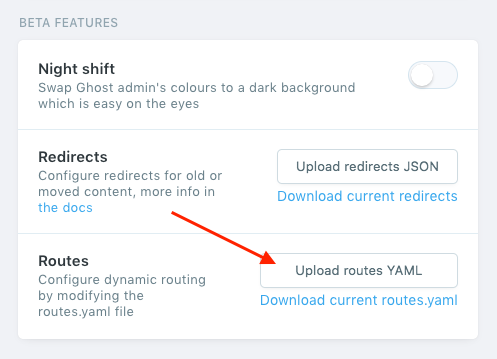
Note: Membership feature was introduced in Ghost v3 and it requires Ghost 3.x at least. Remember to restart your Ghost when you made a change in routes.
Search
- Click
Settings > Integrations > Custom integrations > Add custom integrationto generate a new content API key. - Enter an integration name (e.g. Search) and click
Create. - Copy
Content API Key.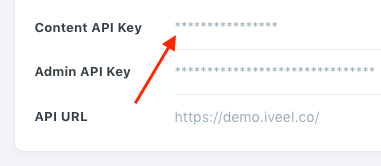
- Enter the key in
partials/config.hbsfile.search_key: 'CONTENT_API_KEY',
The theme generates an index of posts for highly performant search. The index is updated automatically when posts are added or updated. However, it isn't updated when posts are unpublished or deleted. To force update the index, increment the search index migration in partials/config.hbs file.
search_migration: 'v2',Note: Remember to restart your Ghost when you made a change in hbs file.
Featured Posts
- To feature a post, navigate to
Storieson your Ghost Admin.
- Select the post you want to feature and click the settings icon on the top right corner.
- Scroll down the Post Settings menu and check
Feature this post.
Related Posts
- To add tags to a post, navigate to
Postson your Ghost Admin.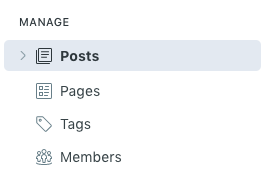
- Select the post and click the settings icon on the top right corner.
- Add the tags in
Tagsfield.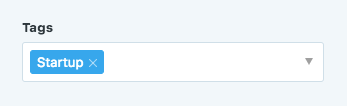
Disqus Comment
The theme has a built-in support for Disqus as a commenting system. Follow only these steps to setup Disqus. You don't need to follow the installation tutorial of Disqus on their site.
- Create a new site on your Disqus dashboard.
- Get your Disqus shortname. Please note that your Disqus shortname will be different than below.
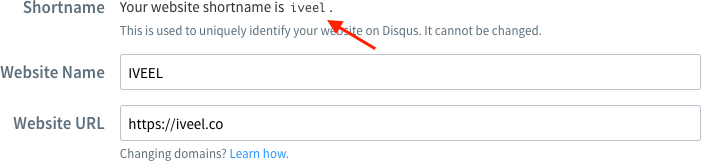
- Insert the Disqus shortname in
partials/config.hbsfile.disqus_shortname: 'your_shortname',
Note: Remember to restart your Ghost when you made a change in hbs file.
Copyright Text
You can display some text on your blog's footer section. By default, it displays Powered by Ghost. To change the text, open partials/copyright.hbs file.
copyright: '© All rights reserved.',You can also add some HTML markup.
copyright: '© All rights reserved. <a href="URL_HERE">More info</a>',Note: Remember to restart your Ghost when you made a change in hbs file.
Social Links
Add your social links in partials/config.hbs to display social links on your blog. All links must be full URL.
social_links: {
  facebook: 'https://www.facebook.com/iveelco',
  twitter: 'https://www.twitter.com/iveelco',
  instagram: '',
  dribbble: '',
  behance: '',
  github: '',
  linkedin: '',
  vk: '',
  rss: '',
},
Note: Remember to restart your Ghost when you made a change in hbs file.
Hosting Fonts Locally
- Click here to download the font files.
- Create a folder named
fontsinassetsdirectory. - Unzip the downloaded file and copy the files to
assets/fontsfolder. - Open
default.hbsfile and comment out the line (wrap inside{{!-- --}}) which embeds Google Fonts. You can search for "https://fonts.googleapis.com" to be more specific.{{!-- <link rel="stylesheet" href="https://fonts.googleapis.com/css?family=..."> --}} - Add the necessary CSS in
Settings > Code injection > Site Headerfield.@font-face { font-family: 'Roboto'; font-style: normal; font-weight: 400; src: url('../fonts/roboto-v20-latin-regular.woff2') format('woff2'), url('../fonts/roboto-v20-latin-regular.woff') format('woff'); } @font-face { font-family: 'Roboto'; font-style: italic; font-weight: 400; src: url('../fonts/roboto-v20-latin-italic.woff2') format('woff2'), url('../fonts/roboto-v20-latin-italic.woff') format('woff'); } @font-face { font-family: 'Roboto'; font-style: normal; font-weight: 500; src: url('../fonts/roboto-v20-latin-500.woff2') format('woff2'), url('../fonts/roboto-v20-latin-500.woff') format('woff'); } @font-face { font-family: 'Roboto'; font-style: normal; font-weight: 700; src: url('../fonts/roboto-v20-latin-700.woff2') format('woff2'), url('../fonts/roboto-v20-latin-700.woff') format('woff'); } @font-face { font-family: 'Roboto'; font-style: italic; font-weight: 700; src: url('../fonts/roboto-v20-latin-700italic.woff2') format('woff2'), url('../fonts/roboto-v20-latin-700italic.woff') format('woff'); }
Hosting jQuery Locally
- Click here to download the latest version of jQuery.
- Save the file as
jquery.min.jsinassets/jsfolder. - Open
default.hbsfile and search for "https://code.jquery.com" to find the<script>tag which embeds remote jQuery. - Replace the entire
<script>...</script>tag with:<script src="{{asset "js/jquery.min.js"}}"></script>